How to create a plugin to convert the image format from JPG to WEBP in WordPress 2024?

If you are a beginner on WordPress websites, you may not worry about the size of the image you upload to your media library. But as your website grows, more and more content is added, making it slow to visit. You need to consider optimizing the images of your website. The best way is to convert your image format from jpg to WebP.

What is WebP?

WebP is an image format developed by Google, designed specifically for web use. Google launched WebP in 2010 and it soon become popular to replace traditional image formats like JPEG, PNG, and GIF in the web design industry. WebP means web pictures. If you are using WebP on your website, it can provide a fast-loading page experience to your customer.

Pros of WebP for websites.

    • Better Compression
    • Lossless and Lossy Compression
    • Transparency Support
    • Animation Support
    • Modern Web browser Support
    • Good for SEO

    Cons of WebP

      • Can’t be edited in Photoshop
      • Not supported by some old version
      • browsers
      • Limited metadata support than jpg

      Therefore, if you want to have a better user experience and ranking on Google, you have better use WebP on your website. There are many WordPress Plugins that can convert your image format from jpg to WebP.

      In this article, we will introduce how to create your own image converter WordPress plugin to convert your image from jpg to WebP.

      Steps to create a real jpg to WebP image converter plugin

      The functionality of the image converter plugin is to convert the image from jpg to WebP simultaneously when you upload the jpg image to the WordPress media library from the WordPress Dashboard.

      Step 1: Set Up the Plugin name it jpg-to-webp-converter

      The first step is to create the basic structure of the plugin.

      • Create the Plugin Folder
        Create a new folder called jpg-to-webp-converter in your PC.
      • Create the Plugin File
        In the jpg-to-webp-converter folder, create a PHP file named jpg-to-webp-converter.php. This will contain the code for your plugin.

      Step 2, Add the below snippet to jpg-to-webp-converter.php

      				
      					<?php
      /**
       * Plugin Name: JPG to WebP Converter
       * Description: Automatically convert uploaded JPG images to WebP format.
       * Version: 1.0
       * Author: WPCOLLEGE
       * Author URI:https://wpcollege.com
       */
      
      // Register the 'wp_handle_upload' filter to convert the image format when uploaded to media library
      add_filter('wp_handle_upload', 'convert_to_webp_on_upload', 10, 2);
      
      function convert_to_webp_on_upload($upload, $context) {
          // Check if the uploaded file is an image
          if (strpos($upload['type'], 'image/') === 0) {
              // Get the original file path
              $original_file = $upload['file'];
      
              // Check if the uploaded file is a JPG image
              if (preg_match('/\.jpe?g$/i', $original_file)) {
                  // Create a new filename with the .webp extension
                  $webp_file = preg_replace('/\.jpe?g$/i', '.webp', $original_file);
      
                  // Convert the image from JPG to WebP using GD library
                  if (imagewebp(imagecreatefromjpeg($original_file), $webp_file)) {
                      // Update the 'url' and 'file' keys to include the new WebP file
                      $upload['url'] = preg_replace('/\.jpe?g$/i', '.webp', $upload['url']);
                      $upload['file'] = $webp_file;
                  }
              }
          }
      
          return $upload;
      }


      You can modify the header code of the plugin. For example, you can change the author’s name to your name and add your website URI. After that, save the code.

      Step 3, Upload the plugin and Activate the plugin.

      • Zip the jpg-to-webp-converter folder.
      • Go to your WordPress dashboard.
      • Navigate to Plugins → Add New → Upload Plugin and upload the ZIP file.
      • Once uploaded, activate the plugin.

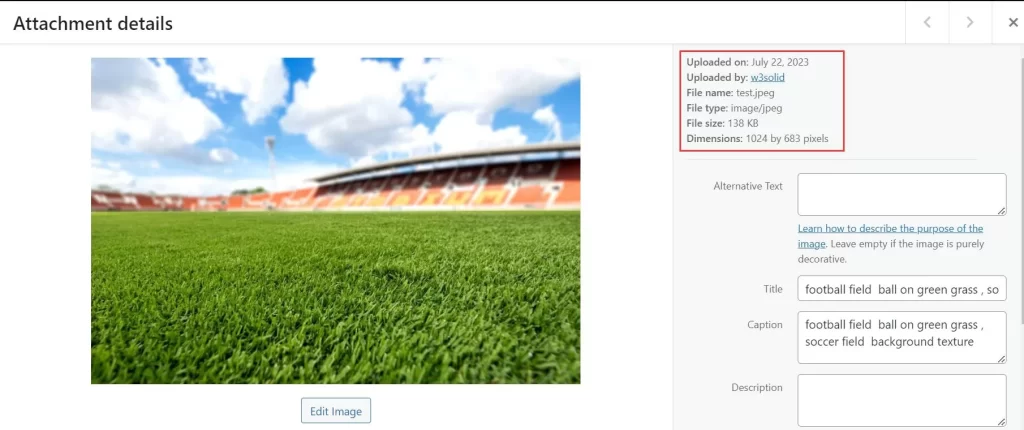
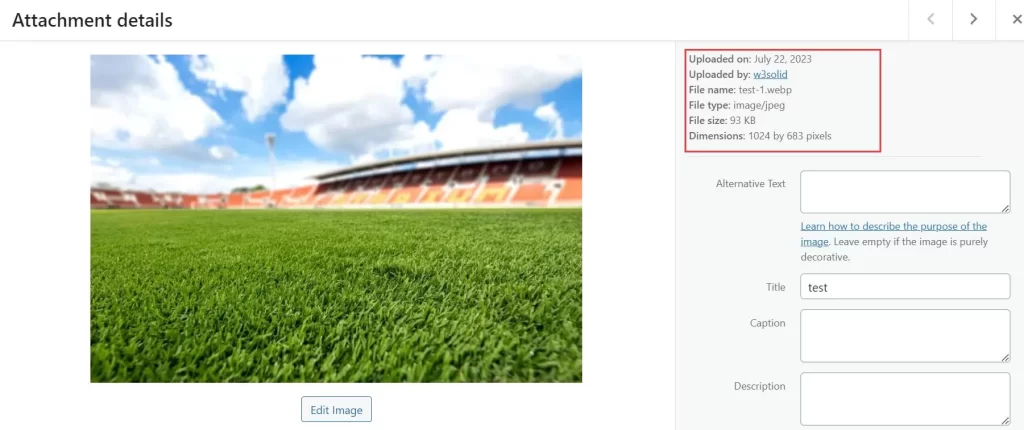
      Now the plugin has been created. You can test it by uploading an image to the WordPress media library. See the below comparison. Before the conversion, the file size is 138 KB, after the conversion, the file size is 93 KB.

      Conclusion

      To automatically convert uploaded images from JPG to WebP in WordPress, thejpg-to-webp-converter is using the wp_handle_upload filter. This filter allows you to intercept the image upload process and perform additional actions, such as converting the image format.

      To make sure the jpg-to-webp-converter plugin works on your website, you need to install the GD library and imagemagick extension to your PHP configuration, as imagewebp function relies on it.

      convert format,decrease size of image

      jpg-to-webp-converter Plugin

      Automatically convert the jpg image to WebP format when you upload it to the WordPress media library. After activation, no other action need. If you don’t want to create it by yourself, you can download it here for free.

      Scroll to Top