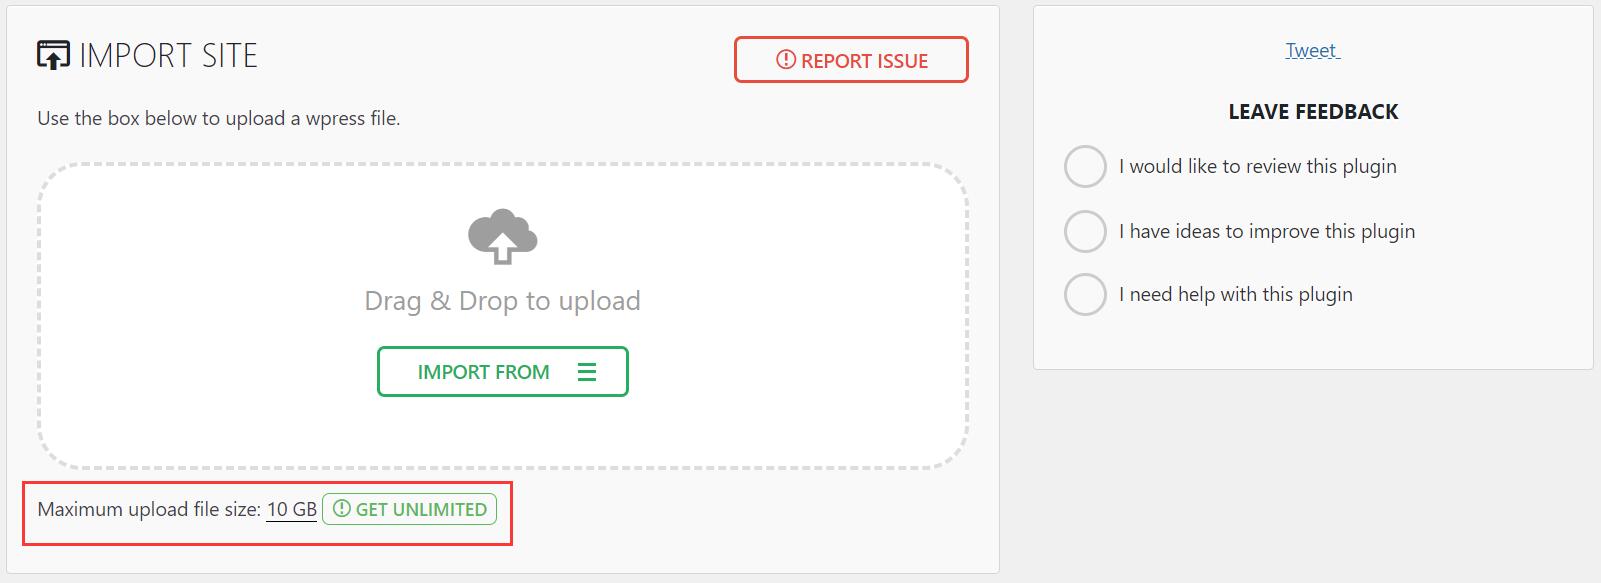
The latest version of the All-in-one WP Migration Plugin has limited the migration file size to 128 MB. They provided an extension to let the users to extend the backup file to 512 MB before. But unfortunately, the extension now is not available, and the users need to pay for the latest unlimited extension now.
Even with a file size of 128 MB, sometimes you get stuck when migrating your site to the new web hosting. You probably get frustrated when this happens.
In this article, we will introduce how to fix when All-in-one WP Migration stucks.
1. Install the version 6.77 of the All-in-one WP migration.
Deactivate the latest version of the All-in-one WP Migration plugin and delete it. Download the version 6.77 of the All-in-one WP Migration plugin.
If you have installed the version 6.77 of the All-in-one WP Migration, disable the auto-update functionality in your WordPress admin Plugins dashboard.

However, the author has deleted the old version of All-in-one WP Migration from their official homepage. You can download it from github.
Plugin to backup and migrate your WordPress website easily
All-in-one WP Migration 6.77
Version 6.77, allows you to migrate your WordPress site with a size less than 512 MB. The latest version only allows 128MB. Users can edit the Plugin snippet to increase the file size up to 10 GB.
The version 6.77 of the All-in-one WP Migration supports a free migration file size of 512 MB. Therefore it’s more convenient for you to back up your WordPress site or upload your export file.
Please noted that not only the exported file should be proceeded in version 6.77 of the All-in-one WP Migration, but also imported files that upload to the new web hosting should be proceeded in version 6.77.
2. Use the backups and restore features of All-in-one WP Migration
Another option to migrate your WordPress site is the backup restore feature of All-in-one WP migration. You can upload the backup file to your website server via file manager or FTP.
If you use the import feature of All-In-One WP Migration, it may stuck if the import file is too big. You can export or download the backup file from your original web hosting to your local document. After that, upload the.wpress file you have downloaded to your new web hosting by file manager or FTP. The backup file should be uploaded to the folder public_html/wp-content/ai1wm-backups
Step 1. Install the old version of the All-in-one WP Migration to your site on the old web hosting.
Step 2. Export your site in the format of .wpress. by All-in-one WP Migration(Version 6.77).
Step 3. Install All-in-one WP Migration(version 6.77) to your site on the new web hosting. and activate it.
Step 4. Upload the exported .wpress file to the new hosting server under the folder of wp-content/ai1wm-backups/. If you are using shared hosting, the path will be public_html/wp-content/ai1wm-backups/
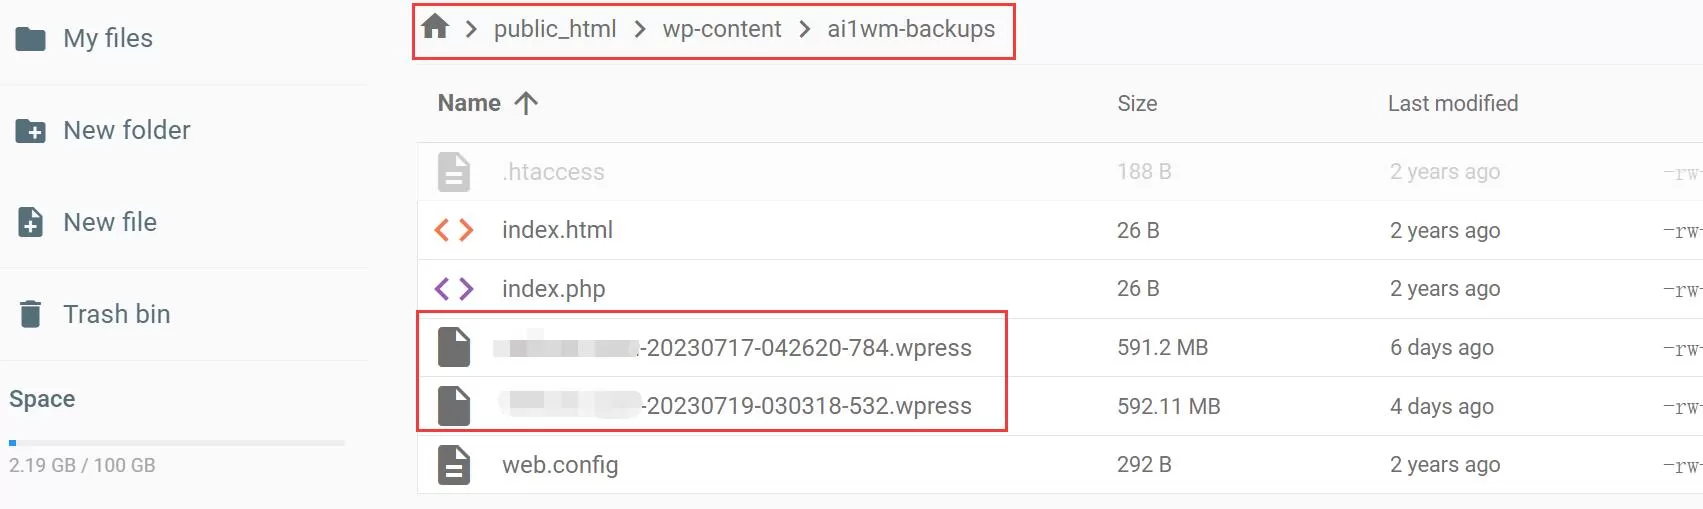
You can use Cpanel if your web hosting server provides such services. Go to file manager and find your site document under the name of your site. If you don’t have Cpanel or can’t access the file manager of your web hosting, you can use an FTP tool to upload the .wpress file or contact your server administrator for help.
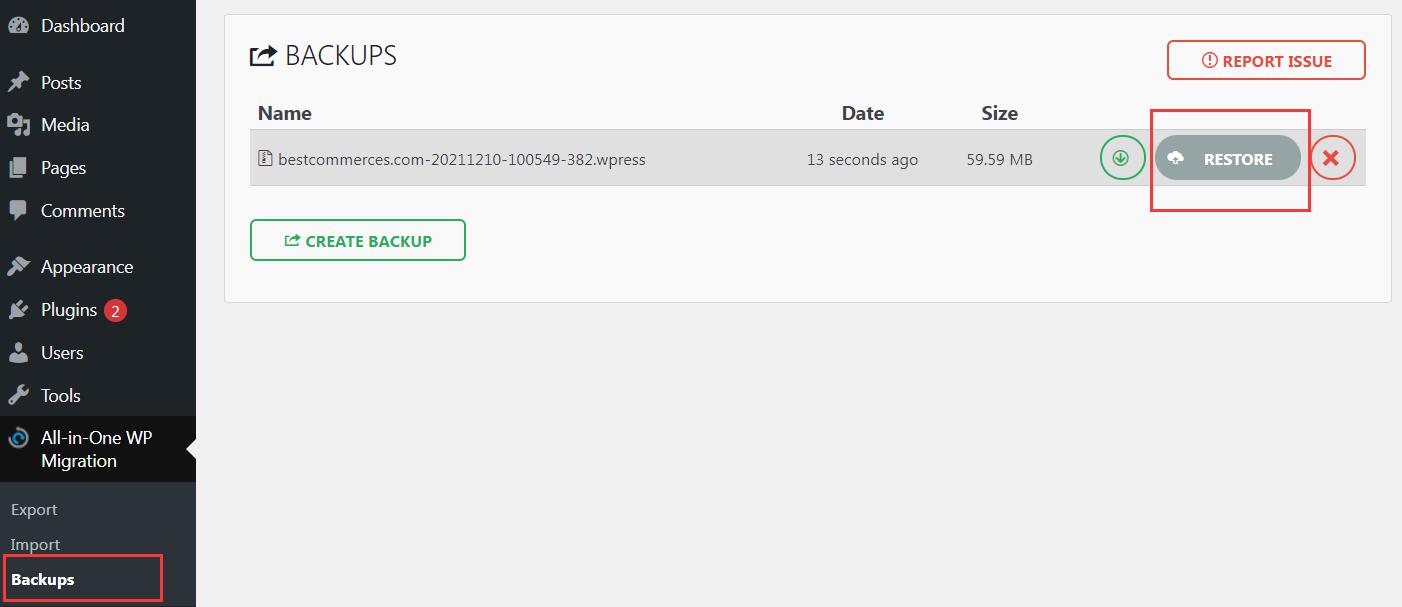
Step 5. Go to your wp-admin dashboard, and find All-in-one WP Migration. Click Backups. You will see the file you upload. Click Restore, you will successfully migrate your site to a new server.
Until now, you can migrate your website successfully by restoring the backup file that you upload to the right folder on your web hosting. Please note that if you have installed some PHP extension on your server, you should also install it on the new web hosting server, otherwise, the migration won’t succeed.
How to increase the maximum file size to 10G?
In the version of 6.77, All-in-one WP Migration still limits the file size that you can import or back up to a maximum size of 512MB. However, when more and more images and video media content are added to the website. 512Mb is not always enough for website owners.

Here we introduce how to increase the maximum size of files you can migrate with All-in-one WP Migration.
You can increase the file size from 512Mb to the maximum file size 10Gb in All-in-one WP Migration.
Please remember, all these steps need to be done in version 6.77, if your all-in-one WP Migration Plugin is not version 6.77, you can download it from GitHub and install it.
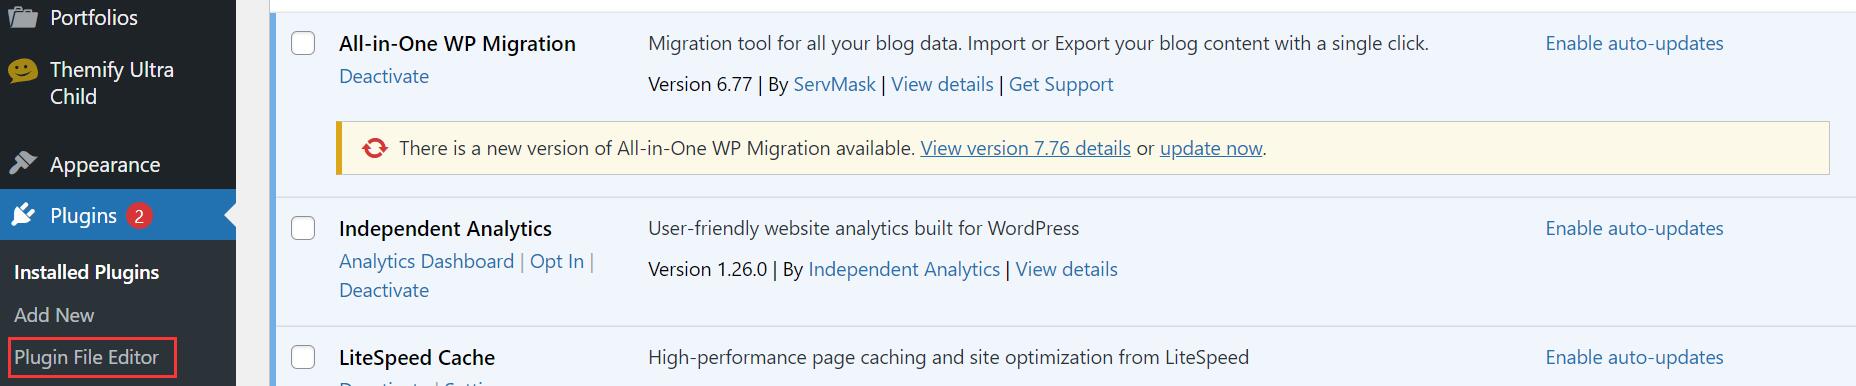
Step 1. Go to the dashboard of your WordPress site, go to Plugins ——–> choose Plugin File Editor from the submenu.
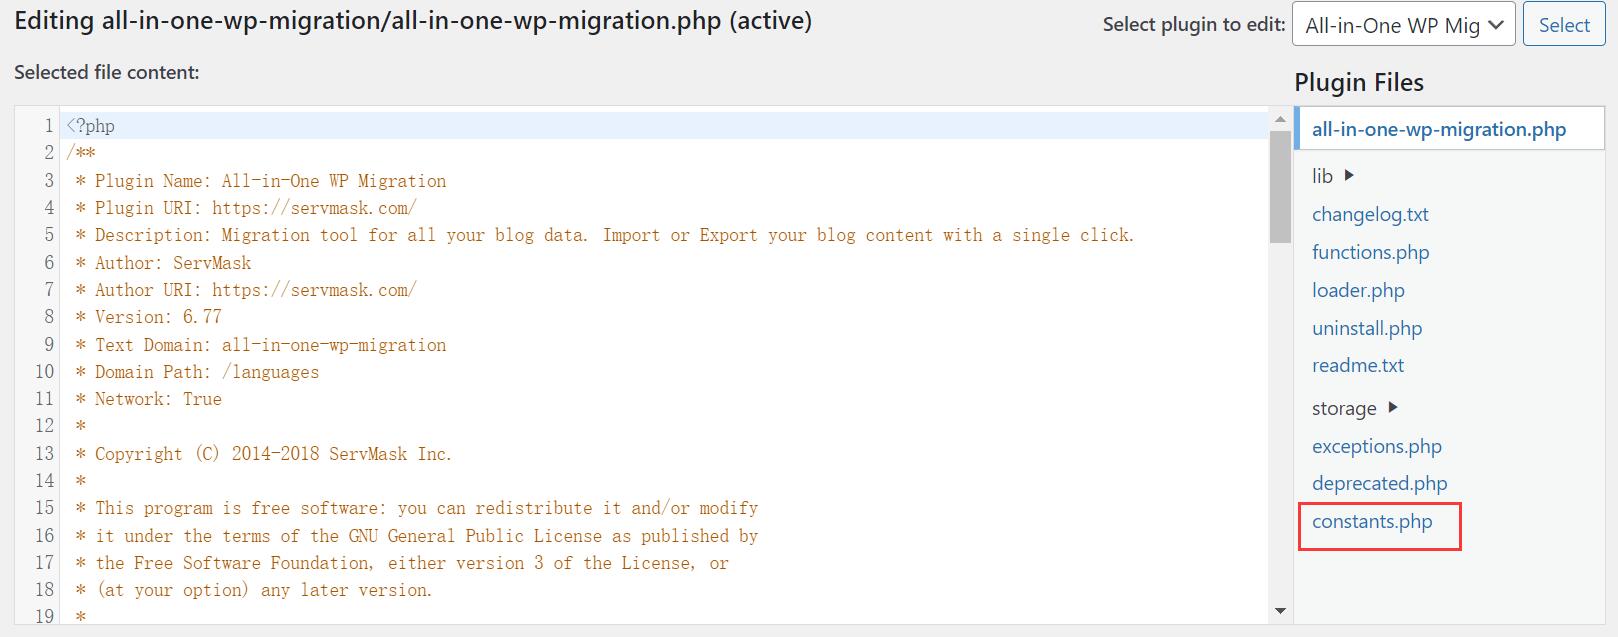
Step 2. When you access the page of Plugin File Editor, Choose All-In-One WP Migration in the right corner and click Select.

Step 3. Once you access the editor of All-In-One WP Migration files, click the constants.php file and start to edit it.
Step 4. Access the code of constants.php, go to line 282, and you will see Max File Size.
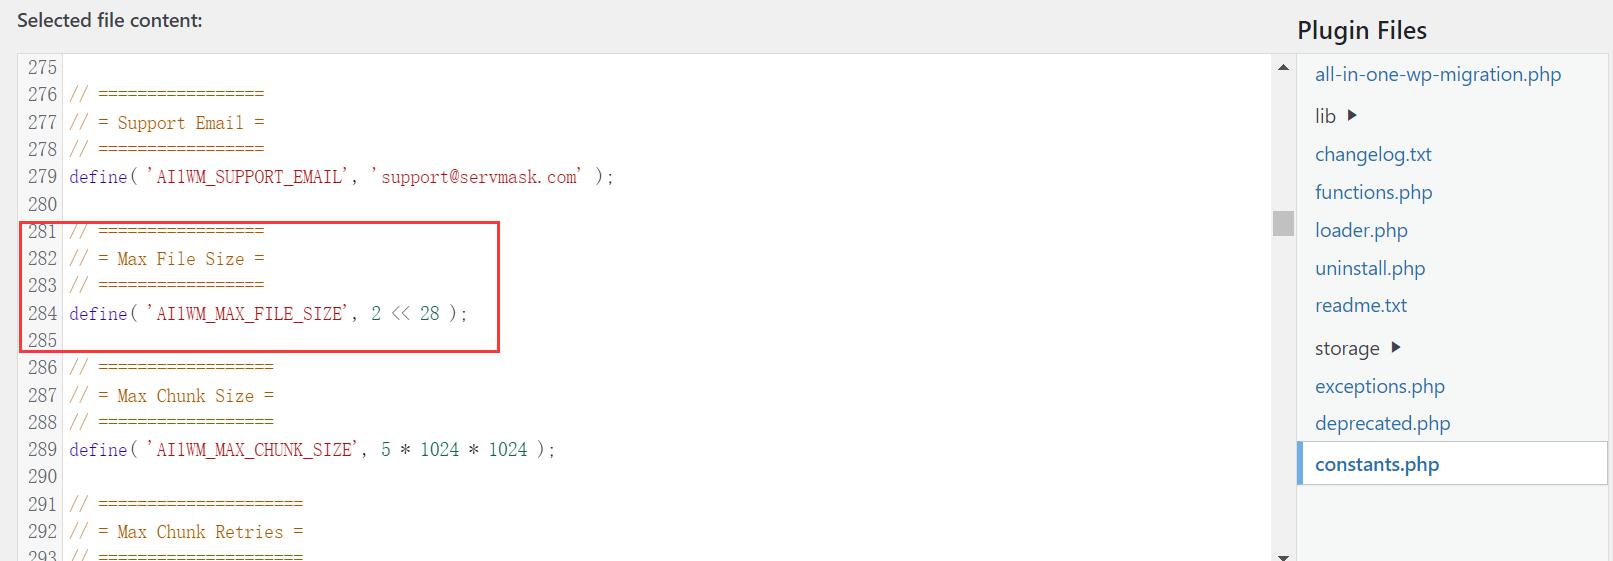
					// =================
// = Max File Size =
// =================
define( 'AI1WM_MAX_FILE_SIZE', 2 << 28 );
This code is set to limit the size of the file you allowed to import or backup. So you need to revise it to the code below.
					// =================
// = Max File Size =
// =================
define( 'AI1WM_MAX_FILE_SIZE', 536870912 * 20 );

After you finish all the steps, click Update file then save the change. You will find that the maximum file size you can import is changing from 512Mb to 10Gb. 10Gb can satisfy almost 99% of your need. If your website is larger than 10Gb, we suggest you spend some money to get a more professional backup service.